
Texas Roadhouse Butter Chicken Skillet: 5 Steps to Juicy Perfection
Introduction
Okay, let me tell you about the Texas Roadhouse Butter Chicken Skillet — it’s seriously one of those “why haven’t I made this before?” kind of dishes. I stumbled on this recipe when I was craving something hearty but didn’t want to spend hours in the kitchen. The beauty here is how it takes a simple chicken breast supper and transforms it with that rich, buttery sauce that’s packed with flavor yet crazy easy to whip up.
What makes this skillet stand out? It’s got this perfect balance of buttery goodness and just the right amount of spices that give it a silky, comforting vibe without overpowering the juicy chicken. I’ve tested this a few times now, tweaking the seasoning and cooking method to get the juiciest chicken breasts that soak up that buttery sauce like a dream.
Plus, this recipe doesn’t demand fancy ingredients or complicated steps — it’s straightforward, forgiving, and quick, which I absolutely adore on those busy weeknights. You just throw everything in one pan and let it work its magic. Trust me, your dinner table will thank you. The aroma alone makes your kitchen last a little longer than normal because you just want to savor that “butter chicken” goodness before it disappears!
Ingredients for Texas Roadhouse Butter Chicken Skillet
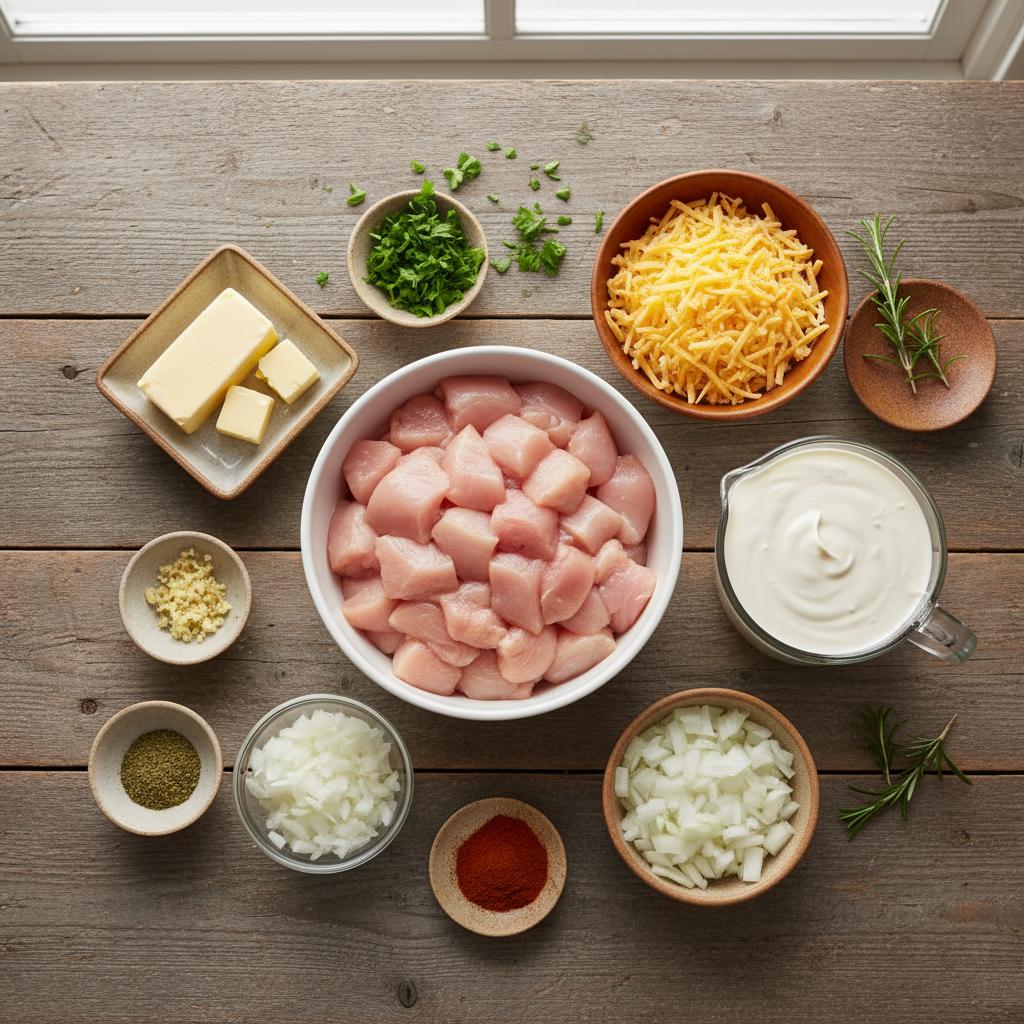
Okay, here’s the good stuff—you’re going to love how simple and satisfying this Texas Roadhouse Butter Chicken Skillet comes together. You want about 2 large boneless, skinless chicken breasts, cut into bite-sized 1-inch cubes—nice and even so they cook up juicy and tender. I always toss mine in a pinch of salt and pepper before anything else; seasoning early makes a huge difference.
For the buttery richness, grab 1/4 cup of unsalted butter—yes, plenty of it, because that’s where the magic starts. Then you’ll need 2 cloves of garlic, finely minced, to give a fragrant punch that’s not overpowering but oh-so-comforting. You’ll also want 1 cup of diced onions, because that sweet-savory base is essential.
Don’t forget 1/2 cup of heavy cream or half-and-half to get that silky, creamy texture that clings to the chicken perfectly. Adding 1/2 cup of shredded cheddar cheese brings a sharp tang that melts into every bite—trust me, it’s irresistible.
Finally, toss in 1/4 cup of fresh chopped parsley at the end for a bright pop of color and flavor, and if you want to kick things up a notch, a pinch of smoked paprika does wonders. Keep these ingredients handy and you’re set for a quick, comforting dinner that feels special without all the fuss.
How to Prepare Texas Roadhouse Butter Chicken Skillet
Alright, let me tell you how I make this Texas Roadhouse Butter Chicken Skillet that’s packed with flavor and so comforting. It’s easier than it looks, I promise! You just need to give yourself a little love in the kitchen, and you’ll be rewarded with juicy chicken swimming in that dreamy butter sauce.
First thing, get your skillet heating up. I like to preheat over medium heat for about 3-4 minutes before tossing anything in. If you jump the gun, your chicken will stick or cook unevenly — and nobody wants dry chicken, right?
Next, you’ll prep and cook the chicken, then whip up that buttery sauce while the chicken takes a little breather on the side. Finally, you bring it all together in the skillet so those flavors marry beautifully with a quick simmer. The whole process moves pretty fast once you get rolling, so have your ingredients ready and don’t wander off!
One tricky thing I’ve learned: don’t rush the browning step. It’s the secret to locking in flavor and that gorgeous golden crust. Also, when it’s time to add your garlic and spices in the sauce, make sure you do it off the hottest burner or it’ll burn instantly — trust me on this one, burnt garlic is a hard no.
Ready? Let’s break it all down to simple, do-able steps!
Preparing the Chicken
Start by slicing your chicken breasts into bite-sized pieces — about 1 to 1 ½ inch chunks work perfectly. Pat them dry with paper towels; this helps the seasoning stick and gives you a better sear later.
Now, season your chicken generously with salt, pepper, and if you want, a little smoked paprika or cayenne for that warm Texas kick. I like to keep it simple but tasty.
Heat a tablespoon of oil in your skillet on medium heat. When it’s hot (you’ll see a bit of shimmer on the surface), add the chicken in a single layer. Don’t crowd the pan! If your skillet isn’t big enough, do this in batches.
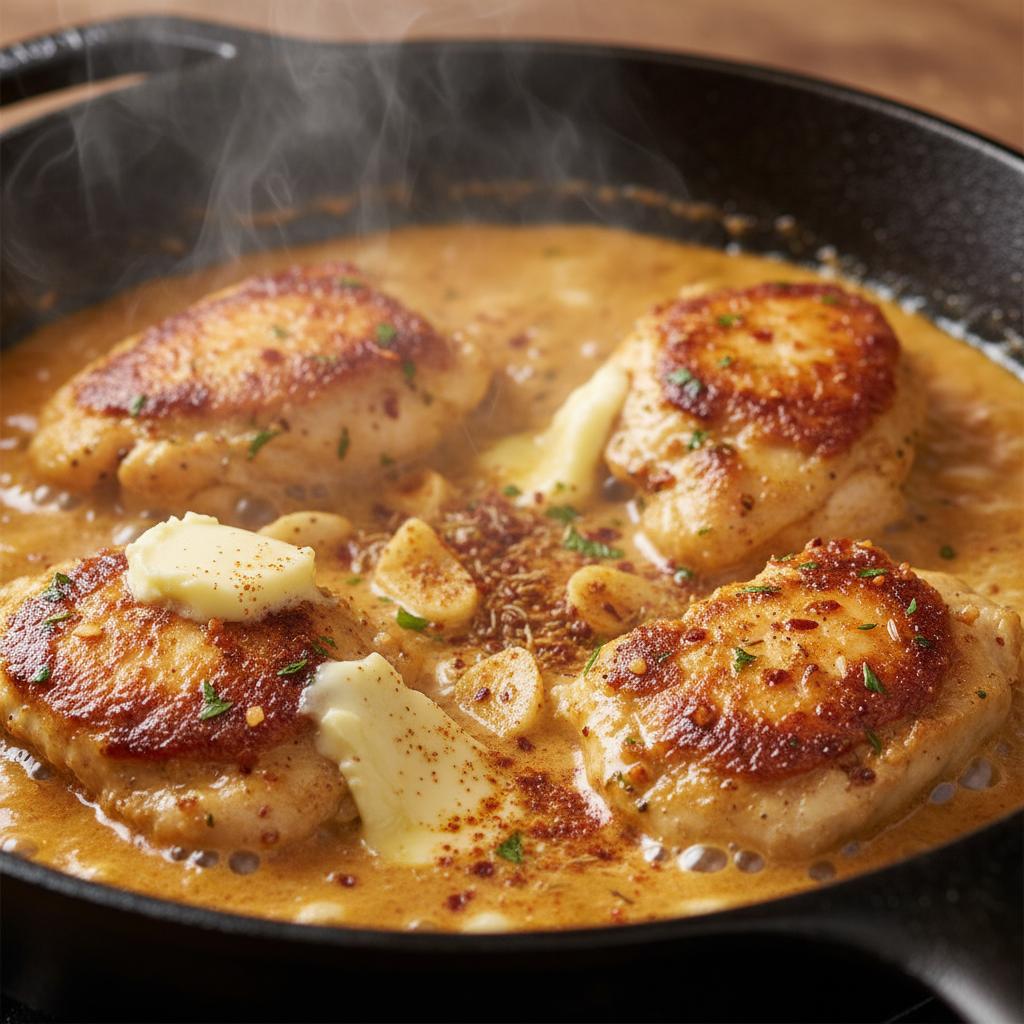
Cook the chicken for about 3-4 minutes on one side without stirring. This is where the magic happens — you’re building that nice golden crust. Flip each piece and cook another 2-3 minutes until it’s almost cooked through. You want the inside tender but not fully done because it’ll finish cooking later with the sauce.
Once browned, remove the chicken and set it aside on a plate. Keep that skillet hot — you’re going to need it again soon.
Making the Butter Sauce
In the same skillet (don’t clean it, please—those browned bits are flavor gold!), lower the heat to medium-low and add about 4 tablespoons of butter. Let it melt slowly; rushing this will brown the butter too quickly.
Once melted, toss in a couple of minced garlic cloves. Stir them around for about 30 seconds until fragrant—watch out here! Garlic burns fast, so keep that butter bubbling gently, not roaring.
Now’s the time to add your seasoning: sprinkle in a pinch of salt, a touch of black pepper, and if you like, a bit of dried oregano or thyme. These little herbs add an earthy depth that’s just perfect.
If you want some texture and richness, splash in a tablespoon of heavy cream or a dollop of sour cream here—it’s optional but I can’t recommend it enough for that velvety finish. Stir gently to combine everything into a smooth sauce.
Let this simmer for about 2 minutes on low, until the sauce thickens just enough to coat the back of a spoon. That’s when you know it’s ready to hug your chicken pieces.
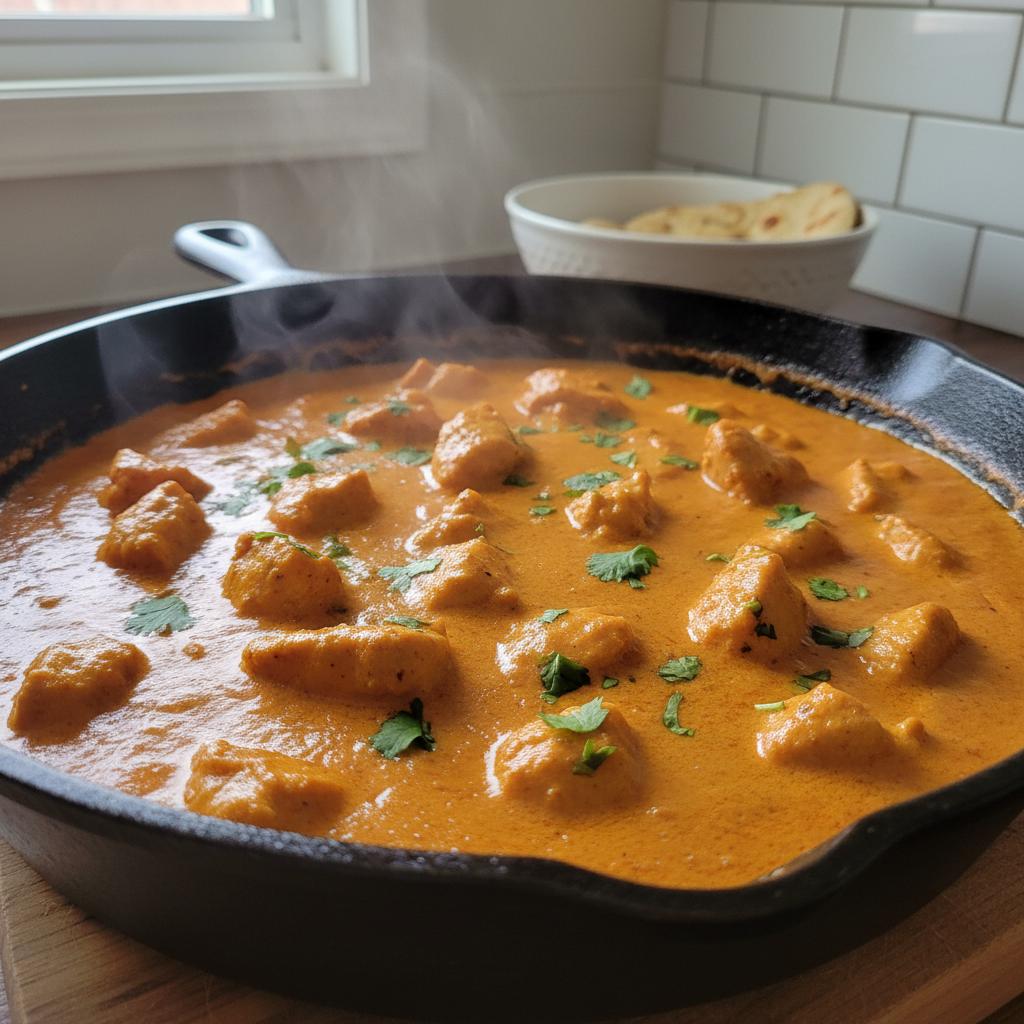
Combining and Finishing the Skillet
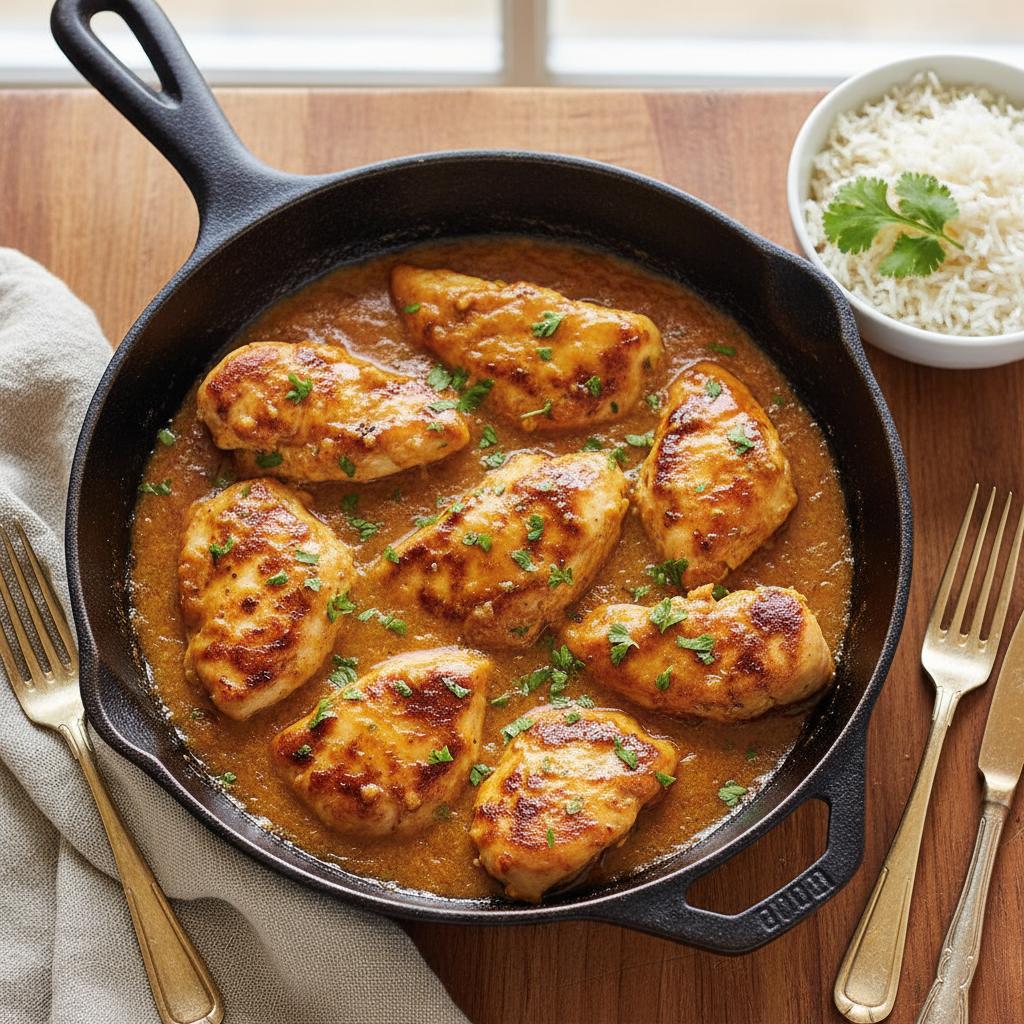
Time to bring your chicken back into the skillet! Pour the browned chicken pieces right into that buttery sauce. Toss everything gently to coat each piece in that luscious butter goodness.
Turn the
Why You’ll Love Texas Roadhouse Butter Chicken Skillet
This butter chicken skillet is my go-to when I want something cozy but not complicated. Seriously, it’s just one pan, which means less mess and way less stress—win-win! The whole thing comes together in under 30 minutes, perfect for those nights when you’re hungry but short on time.
- Super simple to make, even if you’re not usually a “chef.”
- Quick cooking time means dinner’s on the table fast—hello, weeknight hero!
- Authentic, rich flavors that scream comfort without needing rare ingredients.
- Skillet combo lets you cook and serve in the same dish, saving cleanup time.
- Versatile enough to dress up with veggies, rice, or naan to suit your mood.
Honestly, my favorite part is how creamy and buttery it gets without feeling heavy—just the right balance of spice and smoothness. If you love warm, flavorful meals but hate fussing, this skillet is going to be your new best friend. Trust me, once you try it, you’ll want to make it over and over.
Tips for Success with Texas Roadhouse Butter Chicken Skillet
Let me tell you, nailing the Texas Roadhouse Butter Chicken Skillet is all about timing and paying attention to those little details that make a big difference. First, don’t rush cooking the chicken breasts—give them enough time on medium heat to develop that golden crust but don’t let them dry out. Trust me, juicy chicken is the star here, so keep an eye on heat levels and flip carefully.
Handling your ingredients right helps too. Soften that butter ahead of time; it melts evenly and infuses the sauce with that rich, silky goodness. And when you add your spices, toast them lightly in the skillet first—this step really wakes up their flavors and gives the dish a subtle kick.
Oh, and be ready for a little sizzle! Butter and spices can jump when they hit the pan, so keep a sprinkle of patience (and maybe a splatter guard) handy. When it’s all done, don’t forget to let the skillet rest a couple of minutes before serving. This lets the sauce thicken just right and makes plating a breeze—plus it looks gorgeous when you scoop it into your dish with that glistening butter sauce draped over the chicken. I swear, presentation matters even at home!
Ingredient Notes and Substitutions
Alright, let’s talk about what makes this chocolate chip cookie recipe truly shine—and what you can swap if you’re feeling adventurous (or just ran out of something). First off, the butter is king here. I always use unsalted butter because it lets me control the salt level. If you swap for salted butter, go easy on adding extra salt; otherwise, you might end up with cookies that taste a little too salty. Plus, butter gives those edges that perfect crispness while keeping the centers chewy—magic in every bite!
About the sugars: I love the combo of white and brown sugar because it balances sweetness with moisture. Brown sugar’s molasses adds a depth of flavor and keeps the cookies soft and chewy. Using all white sugar? Your cookies will spread more and be crisper, which is cool if that’s your jam.
For the eggs, don’t skimp—using large eggs is key for the right texture and structure. No good substitute here, but if you’re in a pinch, you can try a flax egg for a vegan twist (though it will change the texture a bit).
As for the vanilla, good quality vanilla extract makes a difference. I’ve tried the artificial stuff, and honestly, those cookies just don’t have that warm, cozy vibe. If you want to throw in nuts, walnuts are classic, but leave them out if you’re not feeling crunchy or have allergies—the cookies still taste divine.
Frequently Asked Questions about Texas Roadhouse Butter Chicken Skillet
Q1. Can I use thighs instead of chicken breasts in this butter chicken skillet?
Absolutely! While I love chicken breasts for their lean texture, thighs bring a juicier, more flavorful bite. Just lower the heat a bit because thighs take a little longer to cook through. Either way, you’ll get that rich buttery sauce clinging to every tender piece—yum!
Q2. How can I make this chicken skillet recipe quicker on a busy weeknight?
Oh, I’ve been there! My go-to trick is to butterfly the chicken breasts or slice them thinly before cooking. This way, they cook fast and soak up that buttery sauce quicker. Also, prepping your sauce ingredients ahead really speeds things up—like having your spices and garlic ready to go.
Q3. What’s your secret for that velvety butter chicken sauce?
Such a great question! The magic is in the butter and a splash of cream or yogurt tucked right into the sauce. Don’t skip searing the chicken well first—it creates those golden bits that add serious flavor. Then, stirring in the butter at the end (off the heat if you can) really seals the deal with that silky texture.
Q4. Can I make variations of this butter chicken skillet if I’m watching carbs or prefer something lighter?
Definitely! I love swapping creamy elements for coconut milk or plain yogurt to lighten it up while keeping creaminess. You can also bulk it up with lots of veggies—think bell peppers, spinach, or zucchini—cooked right in the skillet. It’s an easy, tasty way to stretch the meal without losing that cozy butter chicken vibe.
Q5. Any tips for avoiding dry chicken breasts in skillet recipes like this?
Oh yes! The biggest tip is not to overcook. Chicken breasts love to stay juicy and tender, so keep an eye on them and cook until just done. Also, letting the chicken rest a few minutes after cooking helps lock in the juices—don’t skip that! It’s the difference between meh and mouthwatering every time.
Storage and Reheating Instructions for Texas Roadhouse Butter Chicken Skillet
Alright, here’s the deal — this butter chicken skillet tastes even better the next day, but only if you store it the right way. As soon as you’re done eating, let the skillet cool down to room temp (don’t leave it out more than two hours, though!). Then, transfer everything into an airtight container or cover the skillet tightly with plastic wrap. I like using glass containers because they don’t hold onto smells and you can reheat right in them.
Keep your leftovers in the fridge for up to 3 days. Beyond that, the chicken starts to lose that juicy texture, and nobody wants dry chicken!
When you’re ready to chow down again, pop it in the microwave on medium heat for about 2-3 minutes. Stir halfway through (careful, it might splatter), and if it seems dry, add a splash of water or chicken broth before reheating to lock in the moisture. Alternatively, warming it gently on the stove over low heat with a lid works wonders to keep everything saucy and tender.
Trust me, this easy storage and reheating trick means your Texas Roadhouse Butter Chicken Skillet leftovers taste like you just made them fresh. No sad, dried-out chicken here!
Nutritional Information for Texas Roadhouse Butter Chicken Skillet
Alright, let’s talk about the nutrition behind this delicious Texas Roadhouse Butter Chicken Skillet. Now, keep in mind these numbers are ballpark figures since ingredients and brands can vary widely. But generally, you’re looking at around 400-500 calories per serving — which feels just right for a satisfying dinner without that guilt.
The fat content is moderate, usually somewhere near 25 grams, mostly from butter and the richness of the chicken. Protein? Oh yes, plenty! Expect roughly 35 grams per plate, making it a great option when you want to fuel up after a long day. Carbs hover around 15-20 grams, mostly coming from the veggies and any accompanying sides you pair with it.
I love that this skillet balances hearty comfort food with some decent nutrition. Just remember to adjust portions and ingredients as you go, and you’ll have a knockout meal that tastes amazing and keeps you feeling good!
Share Your Experience with Texas Roadhouse Butter Chicken Skillet
Wow, I can’t wait to hear what you think about this Texas Roadhouse Butter Chicken Skillet! Seriously, there’s something about that buttery, garlicky sauce that just makes the chicken sing. If you give it a try, don’t be shy—drop a comment below to tell me how it turned out for you. Maybe you tweaked the spices? Or added your own twist? I love seeing your versions pop up in the comments or photos shared with friends.
And hey, if you have a moment, please rate the recipe too. It helps me know what’s working and what you want more of. Cooking is way more fun when we’re all sharing, so let’s swap tips and stories right here!