
Texas Roadhouse Butter Chicken Skillet Recipe with 7 Simple Steps
Introduction
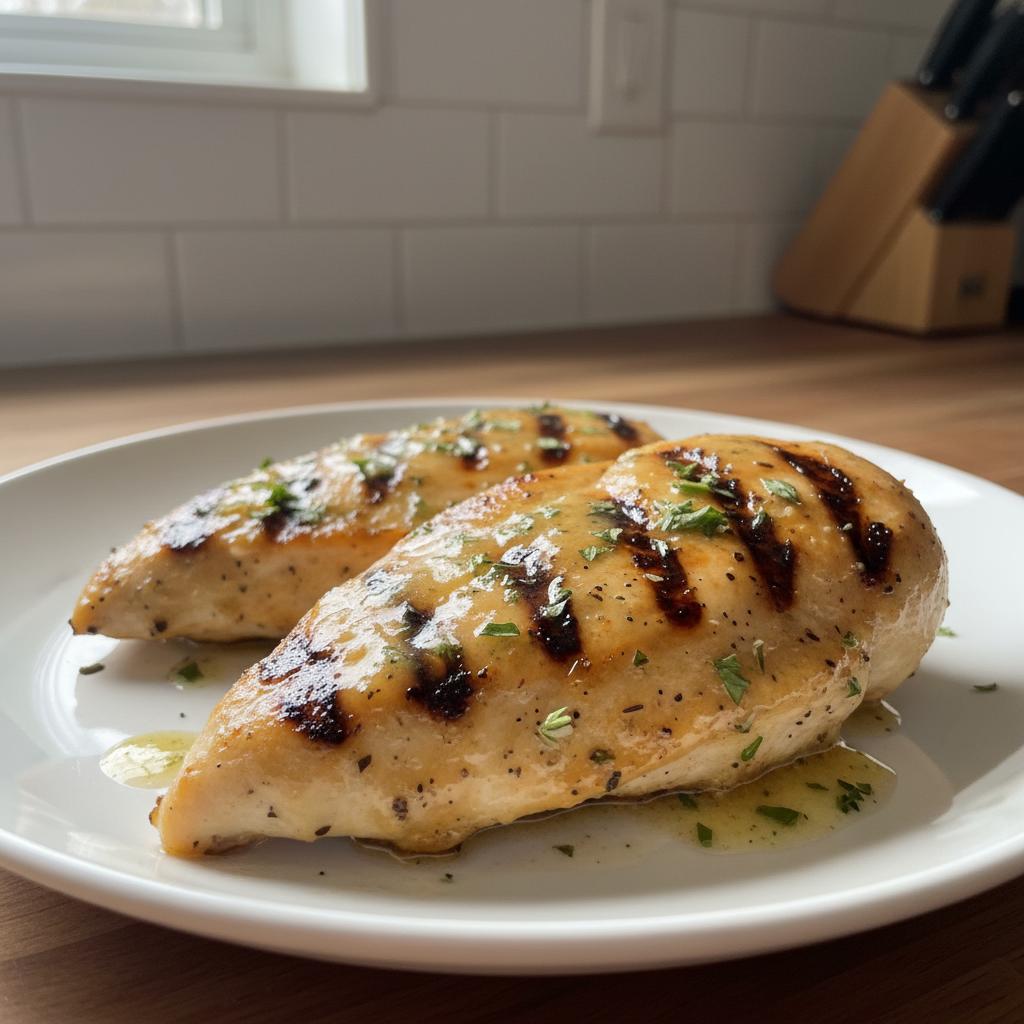
Let me tell you, the Texas Roadhouse Butter Chicken Skillet has become my go-to dinner when I want something rich, comforting, and beyond delicious without too much fuss. It’s one of those dishes that feels fancy but really comes together quickly, which is a total win on busy weeknights. The moment that buttery sauce bubbles up, mingling with tender chicken breast and just the right spices—oh, it’s pure magic. I’ve played around with this skillet recipe enough times now to know all the little tricks: how to keep the chicken juicy, when to add the butter, that final sprinkle of herbs that brings everything alive. Trust me, you’ll want to keep this one in your regular rotation.
What makes this recipe stand out is its perfect balance of bold, buttery flavors and simplicity. It’s not just another chicken breast dinner; it’s a skillet experience that’s hearty, saucy, and totally satisfying. If you’ve ever been intimidated by making restaurant-style butter chicken at home, this recipe breaks it down to easy steps without sacrificing taste. I’m super excited to share it because it’s helped me turn an ordinary chicken breast supper into something my whole family asks for again and again.
Ingredients for Texas Roadhouse Butter Chicken Skillet
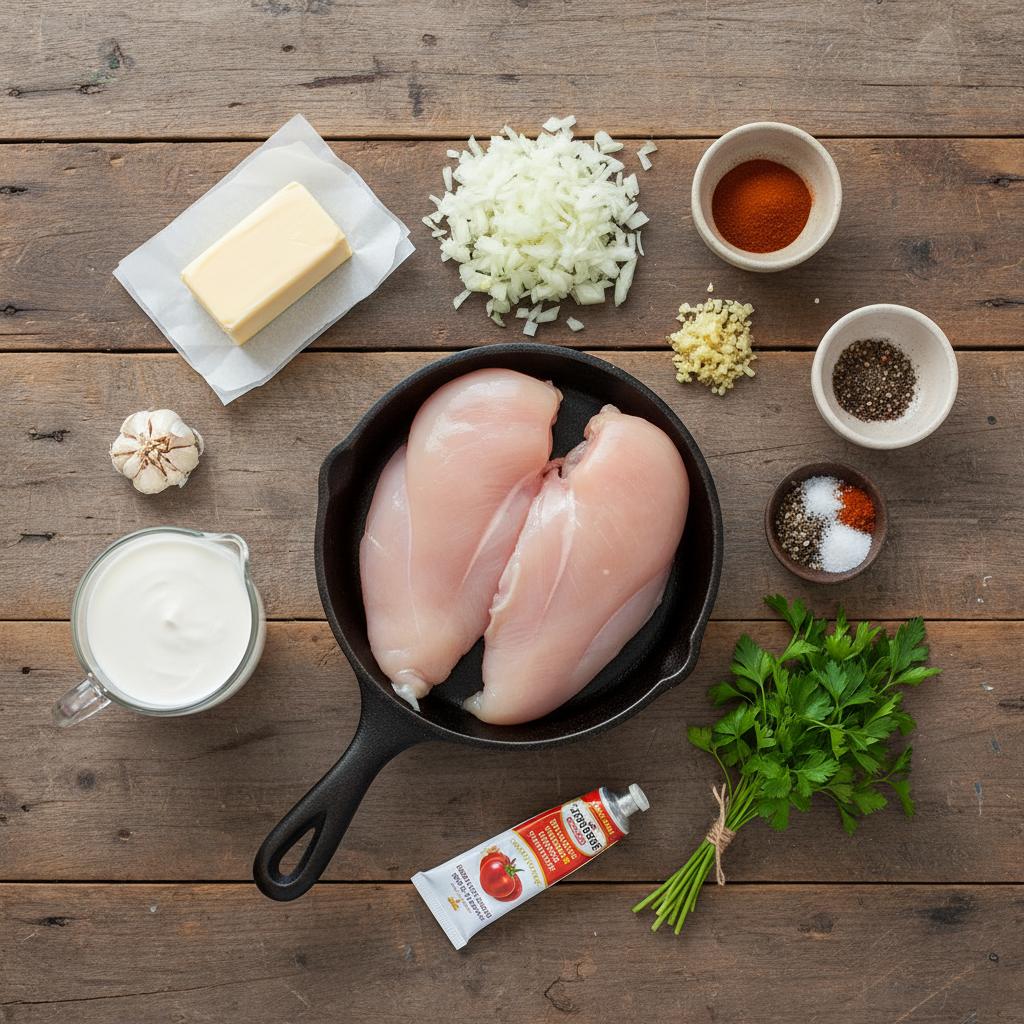
Alright, let’s get down to the good stuff – the ingredients that make up this glorious Texas Roadhouse Butter Chicken Skillet. You’ll want about 1 pound of boneless, skinless chicken breast, chopped into bite-sized pieces – it cooks quickly and soaks in all that buttery goodness. For some fresh flavor, grab 1 small chopped yellow onion and 3 cloves of minced garlic – they’re my secret weapons for that cozy, kitchen-filling aroma.
Next, you’ll need 4 tablespoons of real butter. Trust me, I’m serious about the butter here – it’s what brings that rich, silky finish this dish is known for. To balance things out, measure 1 cup of heavy cream; it makes the sauce luxuriously creamy without being too heavy.
To add some depth, pour in 1/2 cup of chicken broth – it helps keep the sauce smooth and adds a subtle savory note. Don’t forget 1 teaspoon of smoked paprika and 1/2 teaspoon of cayenne pepper for that subtle Texan kick. A pinch of salt and freshly ground black pepper to taste round it out perfectly.
And last, but definitely not least, sprinkle on 2 tablespoons of freshly chopped parsley right at the end. It adds a pop of fresh green and a little zing that cuts through all that buttery richness. Got everything? Great – we’re almost ready to dive into this buttery dream!
How to Prepare Texas Roadhouse Butter Chicken Skillet
Alright, grab your skillet and get ready because this Texas Roadhouse Butter Chicken Skillet is about to become your new favorite dinner. It’s a total game changer—rich, buttery, and packed with tender chicken breast cooked right in the sauce. The best part? It’s way easier than you’d expect. I love how the flavors meld together as the sauce thickens, giving that creamy, buttery goodness coating every bite.
First things first, you want to preheat your skillet over medium heat before adding anything. This really helps to sear the chicken nicely. If your skillet isn’t hot enough, the chicken will just steam instead of getting that golden crust we all crave.
Here’s how I like to break it down—step by step—so you get perfect chicken and sauce every time:
- Start by prepping your chicken breasts, making sure they’re evenly sliced or pounded flat if they’re thick. This helps everything cook evenly, so you don’t get overdone pieces and rubbery bites.
- While the skillet preheats, you’ll season that chicken well. Don’t be shy; salt, pepper, and a touch of garlic powder work wonders here. This simple seasoning sets the stage for the butter sauce.
- Next, melt your butter—yes, butter, the star of the show—in the skillet but keep the heat moderate. Too high, and the butter will brown too fast or burn. Slowly melting it keeps the sauce silky smooth.
- Don’t rush through cooking the chicken. Lay the pieces in the pan without crowding them. Crowding traps moisture and prevents that beautiful sear. Cook each side about 3-4 minutes until golden—you’ll know it’s ready when it releases easily from the pan.
- Once the chicken has that gorgeous golden crust, you’ll add your other ingredients—more butter, maybe garlic, and the secret weapon: a splash of chicken broth or cream—that turns the pan drippings into the magic sauce.
- Let the sauce simmer gently to thicken and coat the chicken. Don’t rush here! The sauce needs a few minutes on low heat to reach that rich, luscious consistency you’ll want to dunk bread in.
- Finally, pull the skillet off the heat and let things rest for a couple of minutes. This lets the chicken relax and absorb all those buttery flavors. Trust me, it makes a huge difference.
Keep a close eye on your cooking times and temperatures, and you’ll nail this dish every time. Oh, and if you’re wondering—yes, you can absolutely tweak the butter level to your taste, but please don’t skip it. That buttery sauce is what puts this skillet over the top.
Preparing the Chicken and Butter Sauce
Getting your chicken ready is the first big step—and it’s easier than it sounds! I usually start by trimming the chicken breasts of any extra fat, then slicing them into even pieces, maybe a bit thicker than strips. If your pieces aren’t uniform, some will cook too fast and dry out, while others lag behind. No fun!
To season, I sprinkle salt, pepper, and a little garlic powder right onto the chicken, rubbing it gently to help the flavors stick. I don’t marinate for hours here—just a quick seasoning before cooking is enough. We want fresh, simple flavors shining through.
Now, for the butter sauce — this is where the magic happens. Pop about 3 tablespoons of butter into your preheated skillet. As it melts, add a minced clove of garlic and cook until fragrant—like, just a few seconds—because burned garlic is the enemy here!
Next, pour in some chicken broth or heavy cream to loosen all the browned bits stuck in the skillet from searing your chicken. These bits are flavor gold. Stir gently and let everything combine into a velvety sauce.
Keep the heat on medium-low for this. You want the sauce hot enough to bubble softly but not so hot it breaks or burns. This gentle simmer will help the sauce thicken and become luscious enough to cling to the chicken perfectly.
Once your sauce is ready, toss your cooked chicken back in, coating each piece. Stir gently but thoroughly so every bit of chicken is wrapped in that buttery goodness. If the sauce looks too thin, just let it simmer a little longer. You’ll know it’s right when the back of a spoon leaves a clear trail.
Cooking and Combining Ingredients in the Skillet
When it’s time to cook the chicken, patience really pays off. You don’t want to rush or flip too early. Lay the chicken pieces down carefully, one by one, so they don’t overlap. This gives you a nice sear and prevents steaming. After 3 to 4 minutes on one side, check if the underside is golden and releases easily. If yes, flip it gently and cook the other side the same way.
Once both sides are cooked, remove the chicken and set it aside on a plate. Leave the skillet on medium-low and add the butter for your sauce. This part is all about slowly building that rich, silky texture.
Add your garlic, then pour in the broth or cream, scraping up all those yummy browned bits stuck to the bottom of the pan. These bits are packed with flavor, so don’t miss this step!
Let the sauce simmer for about 3-5 minutes until it thickens just enough to coat a spoon. If you find it’s getting too thick, add a splash more broth. If too thin, give it a little more time. The right consistency will coat your chicken and feel luxurious on your tongue.
Finally, slide that chicken back into the skillet and gently spoon the sauce over to coat everything evenly. Turn off the heat but keep the skillet on the burner for a couple of minutes so the chicken can soak up all those buttery flavors. You’ll smell that rich aroma—trust me, it’s heaven.
One last tip: don’t overcrowd the skillet at any point. Too many pieces mess with even cooking and mess up that beautiful sauce. If you’re doubling the recipe, cook in batches.
Frequently Asked Questions about Texas Roadhouse Butter Chicken Skillet
Q: How long can I store leftovers of the Texas Roadhouse Butter Chicken Skillet?
Oh, leftovers are a lifesaver with this recipe! I usually keep mine in an airtight container in the fridge, and it’s good for up to 3 days. When you reheat, do it gently on the stove or in the microwave with a splash of water or broth to keep that buttery sauce from drying out. Trust me, it reheats beautifully and tastes almost as fresh as the first day.
Q: Can I swap out ingredients in this recipe if I’m missing something?
Absolutely! I often experiment myself. If you don’t have chicken breasts, boneless thighs work great and stay juicy. Butter is a star here, but you can mix in a little olive oil if you want something lighter. If you’re out of fresh garlic, garlic powder can step in—just use less because it’s more concentrated. And feel free to add veggies like bell peppers or peas for a little color and crunch. This dish is flexible and forgiving.
Q: Does the cook time change if I’m using thicker chicken breasts?
Yes, thicker chicken breasts need a bit more love and time. Usually, I pound them to an even thickness so they cook fast and evenly. If you don’t, just watch the skillet and cook a few extra minutes per side over medium heat until the internal temperature hits 165°F. Cutting into the thickest part to check that the juices run clear never hurts either.
Q: How can I make this recipe a bit lighter or fit dietary needs?
I get it—sometimes you want comfort food without the heavy stuff. You can swap butter for ghee or use a light olive oil version, though that changes the flavor a bit. For dairy-free, coconut oil is a handy substitute. Also, skip any heavy cream additions and stir in a splash of chicken broth instead to keep the sauce silky but lighter. It still tastes fantastic! For a low-carb twist, serve the skillet over cauliflower rice or steamed greens instead of potatoes or bread.
Q: What’s your favorite way to serve the Texas Roadhouse Butter Chicken Skillet?
This is my favorite part! I love spooning that buttery, garlicky chicken over fluffy mashed potatoes or creamy rice to soak up every drop of sauce. Sometimes I add a side of roasted veggies or a fresh salad to brighten things up. Oh, and don’t forget a crusty bread for sopping up all that goodness—it’s almost mandatory in my book!
Don’t be shy about making this dish your own—it’s perfect for those quick chicken breast dinners when you want something that feels special but comes together fast. Just gather your butter, spices, and chicken, and the kitchen will smell amazing in no time!
Why You’ll Love This Texas Roadhouse Butter Chicken Skillet Recipe
Oh, this skillet recipe is a total game-changer when you want a tasty dinner without fussing for hours. What I love most is how quick it comes together—seriously, you can have dinner ready in under 30 minutes. The butter sauce is rich and comforting, but not heavy, and it perfectly coats the chicken for that melt-in-your-mouth feel.
- The prep is super simple—just a few ingredients and minimal chopping.
- The flavor hits all the right notes—creamy, buttery, with a gentle kick that keeps you coming back for more.
- It’s versatile enough to pair with rice, veggies, or even crusty bread to soak up every last drop.
- Because it’s made with lean chicken breast, it feels like a wholesome meal you can feel good about.
- And cleanup? Easy peasy since it’s all cooked in one skillet. You’ll thank yourself on busy weeknights!
Trust me, I keep coming back to this recipe when you want something hearty without turning the kitchen into a disaster zone. You’ll want to have it in your weeknight arsenal, too.
Tips for Success with Texas Roadhouse Butter Chicken Skillet
Alright, let me share what I’ve learned from making this Texas Roadhouse Butter Chicken Skillet a bunch of times—it’s all about the skillet and the heat. First off, use a heavy-bottomed skillet, preferably cast iron or a sturdy non-stick. It holds heat evenly, which is *huge* for cooking those chicken breasts just right. You want the pan hot enough to get a golden sear but not so hot that the butter burns or the spices snap.
Speaking of butter, it can scorch fast, so keep the heat medium to medium-low once you add it. Patience here pays off! If your pan’s too hot, the chicken might crisp on the outside but stay raw inside. Flip gently and avoid poking too much—you want juicy, tender meat, not dry chicken.
Adjusting spices is another fun part. I like it with a little extra kick, so I add an extra shake of cayenne or smoked paprika, but if you’re more sensitive, start mild—you can always spice things up at the end with a pinch of chili flakes. Oh, and don’t hesitate to taste the sauce as it simmers. If it’s feeling bland, a pinch of salt or a squeeze of lemon brightens everything beautifully.
Trust me, the right skillet and steady heat make all the difference. Once you nail that, this butter chicken skillet turns into that rich, cozy meal you’ll want on repeat. Happy cooking!
Variations for Texas Roadhouse Butter Chicken Skillet
Oh, you’re going to love playing around with this recipe! One of my favorite things about the Texas Roadhouse Butter Chicken Skillet is how easy it is to switch things up without losing that rich, buttery goodness. For example, swapping chicken breast for shrimp gives the dish a lovely tender bite and cooks way faster—it’s perfect when you’re short on time but want a fancy feel.
Want more veggies? Toss in sliced bell peppers or fresh spinach toward the end of cooking for pops of color and a fresh twist. I also sometimes add a pinch of smoked paprika or a hit of cayenne for a little kick—trust me, it wakes up the whole skillet.
And don’t worry if you want to swap butter for olive oil—just remember, butter brings that creamy, indulgent magic, so try a mix of both to keep it cozy. These simple tweaks keep your skillet exciting every time you make it.
Storage and Reheating Instructions for Texas Roadhouse Butter Chicken Skillet
Okay, if you’re anything like me, you’ll want to save every bit of this buttery, flavorful chicken goodness. First off, the best move is to pop any leftovers into an airtight container—glass works wonders because it keeps things fresh without weird smells sneaking in. I usually stick my container right in the fridge, and it stays good for about 3 to 4 days. Trust me, this skillet dish keeps its charm well if you don’t let it linger longer than that!
When it’s time to reheat, go slow and steady. I love reheating on the stove over medium-low heat with a splash of water or broth—this tricks the chicken into staying juicy and keeps the sauce creamy without turning it rubbery. Microwave? Sure, but do it in short bursts and stir in between, so the chicken heats evenly. Nobody wants dry, tough bites, right? Oh, and if you want that little extra “fresh-cooked” vibe, finish with a quick sizzle in a hot pan for a minute. You’ll thank me later!
Nutritional Information for Texas Roadhouse Butter Chicken Skillet
Alright, let’s chat about what’s actually going on nutritionally with this Texas Roadhouse Butter Chicken Skillet. I love sharing this because it’s a hearty, satisfying meal that also keeps things pretty balanced. Typically, a serving clocks in around 450-550 calories. You get a good chunk of protein from the juicy chicken breast—perfect for keeping you full. The butter and cream add richness, so expect a fair amount of fat, mostly from saturated sources. Carbs? They’re modest, coming mainly from the veggies or any sides you toss in.
But here’s the thing—these numbers can change quite a bit depending on the brands you use or tweaks you make. So don’t stress if your tally is slightly different. Think of this as a friendly guide rather than gospel. I always like to eyeball it and adjust based on hunger, activity, and cravings. Trust me, once you get the balance right for you, this skillet becomes a go-to dinner that’s both delicious and nourishing!